Slolam Pilago Walkthrough
You start on Medium with a Commander and three Fink scouts on a small island at the south end of the map. Arm has 75 units, and nearly all of them are fixed defences: 23 Sentinels on the crater island and five islets, 8 Defenders, 7 L.L.T.s and 3 Torpedo Launchers. The ones that move are 12 Lurkers, 4 Conquerors and 11 aircraft. You win by destroying one building, the Fusion Reactor inside the crater in the north.
Your island has only two metal deposits, but energy is plentiful. The Lurkers patrol around your island from the first minute, so the water is unsafe until your Torpedo Launchers are out. Hold the island, build a wing of Hurricane bombers, which cost little metal, and destroy the reactor in one run from the east. The moment it is hit, six Freedom Fighters set off for your Commander.
The Battlefield
The map is tall and narrow, and almost all of it is sea. Your island is at the bottom. The crater island fills the north-centre: a ring of high ground around a hollow, with the reactor inside and Sentinels on the rim and the shore. Arm's air base is on the island in the north-west corner. Between them, five islets each hold three Sentinels and a Defender.
The numbers on the map are the plan; the letters are Arm's positions. The units shown are those of Medium, and hovering over a dot shows its orders.
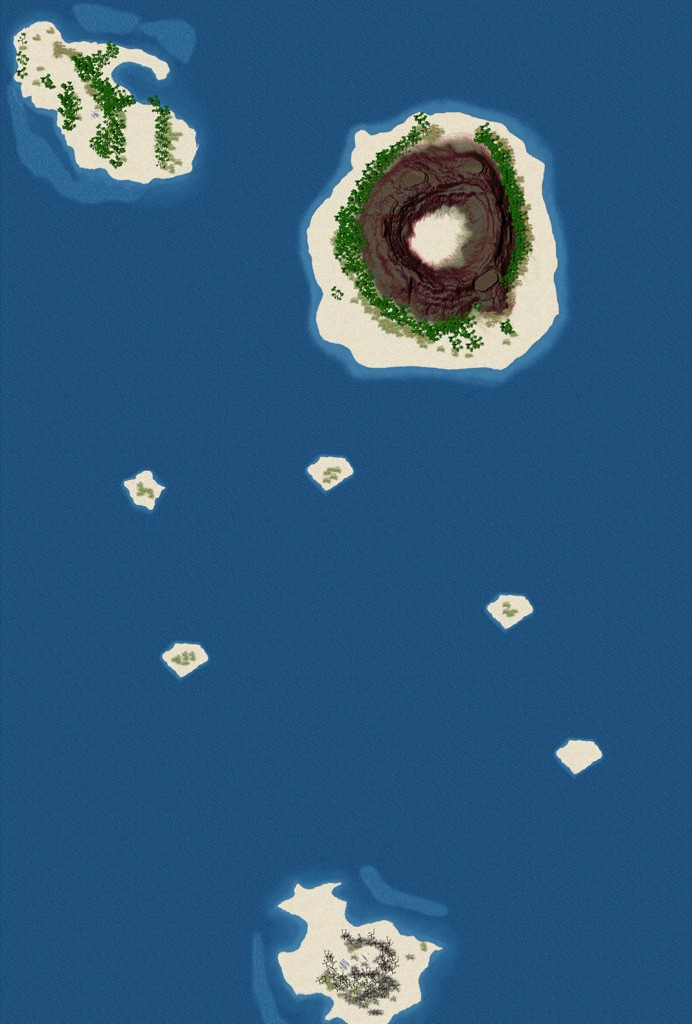
- 1Your start. The deposits at (1592, 4504), worth 223, and (1688, 4472), worth 116, are the only two you can use.
- 2Core Torpedo Launchers and a Sonar Station, where the Lurkers start their loop.
- 3Your Aircraft Plant and Adv. Aircraft Plant, in the south of the island.
- 4Two Punishers on the north shore, for the Conqueror that comes at 28:40.
- 5The bombers' turning point in the south-east.
- 6The start of the bombing run, east of the crater island. The reactor is 1090 pixels west of here.
- AThe Fusion Reactor, inside the crater. Destroying it wins the mission.
- BAn islet with three Sentinels. Attacking its southern Sentinel starts two Hawk patrols over it.
- CThree Sentinels and a Defender. The bombers' route passes about 440 pixels from the Defender, inside its range of 700.
- DThe 12 Lurkers gather here, then patrol a loop around the north of your island to (2318, 4581) and back.
- EA Conqueror. At 28:40 it sails to attack your Commander.
- FA Conqueror that patrols east to (2939, 2624) from 10:00. Another, from (432, 2688), patrols east to (2939, 2524) from 15:00.
- GSix Freedom Fighters and four Hawks. They wait for an attack on the reactor or on B.
- HA Conqueror with a 25:00 timer and an order the guide cannot read.
Arm's Timetable
Arm has few timed orders here. Most of its units only guard, and the rest patrol or wait for an attack. These are the moves on Medium, counted from the start of the mission.
| Time | What happens |
|---|---|
| From the start | The 12 Lurkers head for D and then patrol a loop around your island, by (842, 4422), (1015, 3931), (1365, 3672), (2042, 3642), (2412, 4147) and (2318, 4581), and back the same way. One Hawk patrols around the crater island, by (2528, 1676), (1416, 1676) and (1416, 530). |
| 10:00 | The Conqueror at F starts a patrol east to (2939, 2624). |
| 15:00 | The Conqueror at (432, 2688) starts a patrol east to (2939, 2524). |
| 25:00 | The Conqueror at H finishes its wait. The rest of its order is written without a comma in the mission file, and the guide cannot read it. |
| 28:40 | The Conqueror at E attacks your Commander. |
| When the reactor is attacked | The six Freedom Fighters at G attack your Commander. Two Hawks fly to the reactor and patrol over it, between x 1538 and 2485. |
| When the Sentinel at B is attacked | Two Hawks patrol over the islet, between about (1129, 2180) and (1851, 2240). |
The two Rangers south of the north-west island wait 150 minutes. The two Skeeters beside them have no orders.
The Plan on Medium
Hold the Island (0:00 to 12:00)
- Put Metal Extractors on both deposits at 1. Build Wind Generators and Solar Collectors on land: the wind runs from 700 to 4000.
- Spread the three Finks over your island and the water north of it. Each has radar that reaches 650, enough to see a Conqueror long before it arrives. A Fink has 90 hit points, so keep them away from the Defenders and the crater island's Hawk.
- Have the Commander build Torpedo Launchers and a Sonar Station at 2. The sonar reaches 1223, and a Lurker has 610 hit points, so two torpedoes from a launcher (400 damage each) sink it. The Lurkers start all over the map, so they reach the loop at different times.
- Add more Torpedo Launchers off the north and east shores, then Tidal Generators behind them. The tidal strength is 45, but anything in the water is a Lurker target.
Build the Air Wing (12:00 to 30:00)
- Build the Aircraft Plant at 3, a Construction Aircraft, and then the Adv. Aircraft Plant. Start on Hurricanes. Each costs 220 metal and 8050 energy, which suits an island with two deposits and plenty of power.
- Add Metal Makers to turn spare energy into metal, 60 energy for each metal.
- Put two Punishers at 4 before 28:40, and keep the Commander in the south of the island. The Conqueror's cannon reaches 1300 and a Punisher's 1200, so with the Commander well back it has to sail into the Punishers' reach. It has 4050 hit points, or 13 Punisher shells. Be ready for the Conqueror at H as well.
- Ring the Commander with Pulverizers. A Pulverizer missile does 95 damage to a Freedom Fighter, which has 196 hit points.
- Build a few Vamps to fly with the bombers. A Vamp missile does 155 damage to a Hawk (510 hit points), and a Hawk missile does 150 to a Hurricane (480).
Bomb the Reactor
- Gather the wing at 3 and fly to 5, then north to 6. That leg passes within reach of the Defender at C. Bomb it on the way, since it has 295 hit points and a bomb does 187, or accept a few missiles of 97 damage each.
- From 6, turn west and bomb A. On Medium no Defender stands on the crater island. One Hawk patrols around it, and two more come once the reactor is attacked.
- The reactor has 3100 hit points, so it takes 17 bomb hits. Send enough Hurricanes to do it in one pass. The mission ends the moment it is destroyed.
- Keep away from B. Attacking the Sentinel there sends two more Hawks.
What Changes on Hard
- Five Defenders stand on the crater island, at (1680, 704), (2448, 832), (1488, 1296), (1712, 1664) and (2272, 1664). All five reach the reactor, so bombers would fly into all of them at once. A fleet is the better tool.
- For the fleet, build a Shipyard behind your Torpedo Launchers, a Construction Ship and an Adv. Shipyard, then Executioners. Sail them up the east edge to 6 and shell the reactor from there. Their range is 1300, the Sentinels reach only 430, and 15 shells destroy the reactor.
- A Torpedo Launcher at (2912, 1936) guards that route, and the Sentinels at C stand close to it. Destroy them all from beyond their reach on the way north.
- Three more Freedom Fighters patrol from the start between the west edge, near (100, 2650), and (3055, 2544), next to the route to 6.
- A second Hawk patrols around the crater island from the start.
- The Conqueror patrols at 10:00 and 15:00 do not happen. The Conquerors at E and H keep their orders.
- On four islets, B and C among them, a Sentinel replaces the Defender. There are 25 Sentinels in all, and no Defenders on the north-west island.
- Your forces and starting resources do not change. Arm keeps all the income its buildings make, against 70 percent on Medium, but it has no factory here.
Which Units Beat Theirs
| Arm unit | Its threat | Your answer |
|---|---|---|
| Lurker | Torpedo, 350 damage, range 400. 610 hit points | Core Torpedo Launcher: 400 damage, two hits |
| Conqueror | Cruiser cannon, 208 damage, range 1300. 4050 hit points | Punishers, once it comes in for your Commander; Executioners |
| Sentinel | Laser, 180 damage, range 430 | Stay more than 430 away; Executioners outrange it |
| Defender | Missiles, 97 damage to a Hurricane, range 700. 295 hit points | Two Hurricane bombs |
| Hawk | Two missile launchers, 150 damage each to a Hurricane. 510 hit points | Vamp (155 damage to a Hawk) |
| Freedom Fighter | Comes for your Commander. 196 hit points | Pulverizer (95 damage) |
| Fusion Reactor | The objective. 3100 hit points | 17 Hurricane bombs, or 15 Executioner shells |
Metal and Energy
Metal is the hard part. The map has three deposits. Two are yours: (1592, 4504), worth 223, and (1688, 4472), worth 116. The third, worth 187, lies at (440, 568) in Arm's north-west base, under its own Metal Extractor. The ground elsewhere has a surface value of 4, there are no rocks to reclaim, and there are no geothermal vents. Put a Moho Mine on the 223 deposit when you have an advanced builder.
Energy is the answer. The tidal strength is 45, close to the game's highest, and the wind runs from 700 to 4000. Fill the safe water with Tidal Generators, and feed the surplus into Metal Makers. An Adv. Construction Aircraft can build a Fusion Power Plant, which makes 1050 energy. Hurricanes cost little metal and a lot of energy, which is why the plan uses them.
Traps
- An attack on the reactor sends six Freedom Fighters after your Commander and two Hawks over the crater. Hit it with everything at once.
- An attack on the southern Sentinel at B sends two more Hawks over that islet.
- The 12 Lurkers circle your island for the whole mission. Tidal Generators, ships and anything else in the water near the island are their targets.
- The Conqueror at E is ordered to attack your Commander, and losing him loses the mission. The one at H may come too.
- Finks and bombers that stray near the islets meet Defenders with a range of 700.