Alien Bugs Walkthrough
This mission gives you a Commander and nothing else, in the east of a green map cut by rivers. Arm holds the west, where the Alien Beacon stands at (416, 2512). Between you lies a crater full of Scorpions, the native life of this world, which fight on Arm's side. On Medium Arm fields 16 Scorpions, 6 Sentinels, 3 Guardians and 17 Defenders, and two factories that turn out aircraft and hovercraft for most of the mission.
To win you must capture the beacon and destroy every Arm unit and every Scorpion. If the beacon is destroyed you cannot win, and once it is yours, losing it loses the mission. So the work is slow and careful: hold your corner with towers that out-range the Scorpions, shell the crater from a distance, break Arm's river line and its long-range towers, and only then walk the Commander in.
The Battlefield
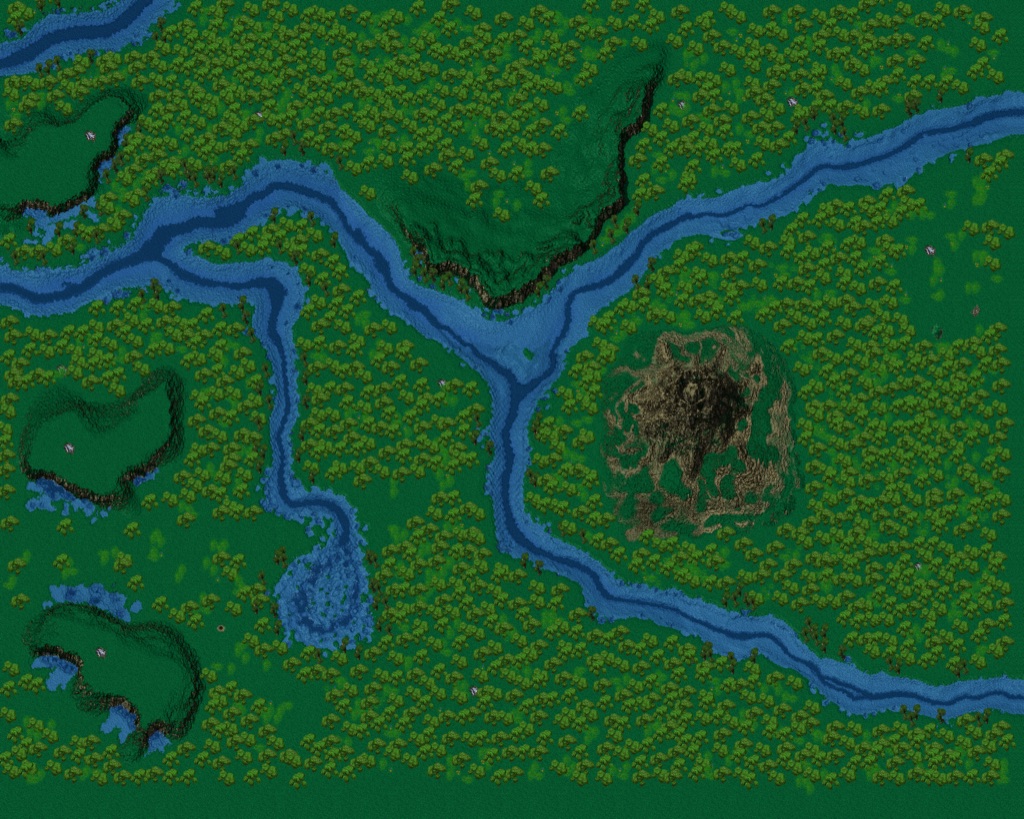
A river runs in from the north-east and another from the west, and they meet at about (2370, 1580). A third leaves that junction and winds away to the south-east. Your start sits in the eastern block between these rivers, and a rocky crater fills the middle of that block around (3180, 1950). Arm's base takes up the western third of the map, around three raised plateaus near the west edge. The beacon stands on low ground between the middle and the southern plateau.
Blue numbers mark the plan and red letters mark Arm. The map shows the Medium set-up.
1 geothermal vents
- 1Your start. Deposits worth 223 lie at (4216, 1160) and (4248, 1528), and one worth 127 at (4424, 1432). A Scorpion starts at (4160, 1472) and patrols towards the crater.
- 2Your first Gaat Guns, facing the crater.
- 3Punishers here reach across the whole crater. Later the Intimidator goes here too.
- 4Once the crater is clear, Diplomats stand here to shell the towers at B.
- 5The staging point for the attack on Arm's base, once the Guardians are gone.
- 6The Alien Beacon. Bring the Commander here to capture it.
- AThe crater. Eleven Scorpions start in and around it. The one at its centre, (3136, 1872), wakes two others when it is attacked.
- BA Moho Mine by the river junction, with Sentinels at (2064, 1712), (2112, 2160) and (2112, 2320) and two Defenders.
- CTwo Brawlers. When the Moho Mine at B is attacked, they fly north and patrol near (2230, 1480).
- DThe Adv. Aircraft Plant. From 3:20 it builds Brawlers and Hawks in turns.
- EThe Hovercraft Platform. From 1:40 it builds Wombats, Skimmers, Anacondas and Swatters.
- FOne of three Guardians, with a range of 1250. The others are at (704, 2000) and (288, 896).
- GTwo Brawlers. At 8:20 they fly to H and patrol back and forth.
- HThe far end of the Brawler patrol, just north of your start.
Arm's Timetable
These are the Medium orders, counted from the start of the mission. Two groups move only when something of theirs is attacked; they are at the end of the table.
| Time | What happens |
|---|---|
| From the start | The Scorpion at (4160, 1472) patrols to (3362, 1933) and back. Three Skimmer scout hovercraft patrol out from the west: one to (4289, 593), north of your start, one to (4135, 3157) and one to (2363, 1768). The Spider guards the beacon. |
| 1:40 | The Hovercraft Platform at E starts its rounds: 2 Wombats, 4 Skimmers, an Anaconda and a Swatter, then a pause of 1:40, again and again. |
| 2:00 to 5:00 | Seven more Scorpions start short patrols in and around the crater at A, the first at 2:00 and the last at 5:00. |
| 3:20 | The Adv. Aircraft Plant at D orders its first 2 Brawlers. Three Hawks start to guard the beacon. |
| 5:00 | Four Wombats patrol north from (1470, 2790) to about (1150, 1300). Two Brawlers patrol north from (620, 3190) to about (890, 990). |
| 6:40 | Four Hawks patrol from (150, 2540) to the crater at (3475, 1726). |
| 8:20 | The two Brawlers at G fly to H and patrol. Three Scorpions in the north, near (2300, 1000), patrol to (2163, 586). |
| 10:00 | Two Phoenix bombers attack your Hovercraft Platforms, then your Aircraft Plants, then your Commander. |
| 15:00 | One more Scorpion at (2688, 3344) patrols to (1640, 1455). |
| When the Moho Mine at B is attacked | The two Brawlers at C patrol north to around (2230, 1480). |
| When the Scorpion at the centre of A is attacked | Two Scorpions at (3440, 2048) and (3472, 1744) attack your Commander. |
The Plan on Medium
Hold Your Corner (0:00 to 10:00)
- Deal with the Scorpion from (4160, 1472) first. Its beam reaches 320, further than the D-gun's 240, and does 400 damage a shot. Its sight is only 210, though. Park the Commander near (4160, 1472), where it turns back each time, and fire the D-gun as it walks in.
- Build Metal Extractors on the three deposits at 1 and Solar Collectors for energy. Then build a Vehicle Plant and two Construction Vehicles.
- With the Construction Vehicles, build Gaat Guns at 2. A Gaat Gun reaches 400 and does 180 damage a shot, so it out-ranges a Scorpion and needs six shots to kill one. Some of the crater patrols pass within its reach.
- Before 8:20, put Pulverizers round the base, for the two Brawlers that patrol to H. At 10:00 two Phoenix bombers come for any Hovercraft Platform, then any Aircraft Plant, then the Commander. Build neither plant until the Pulverizers stand. Each Pulverizer missile does 95 damage to them, and a Phoenix has 470 hit points.
Clear the Crater (10:00 to 30:00)
- Build an Adv. Vehicle Plant and put Punishers at 3. Their range of 1200 covers the crater, and four shells destroy a Scorpion.
- Keep the Commander behind the Gaat Guns while the Punishers work. As soon as the Scorpion at the centre of A is hit, two others come for him.
- Sweep what is left of the crater with Goliaths (2845 hit points, range 400) and Diplomats.
Break the River Line (30:00 to 50:00)
- Move the Diplomats to 4. Their rockets do 500 damage at a range of 800, beyond the Sentinels (430) and the Defenders (700) at B. Have Pulverizers or Cobras with them before you hit the Moho Mine, because that wakes the two Brawlers at C.
- Build an Adv. Construction Vehicle, two Fusion Power Plants and then an Intimidator at 3. Its range of 5120 covers the whole map. Shell the three Guardians first, because their 1250 out-ranges everything else you have. Then shell the Flakkers, the Hovercraft Platform at E and the Adv. Aircraft Plant at D.
- Do not fire the Intimidator at anything near the beacon. The Air Repair Pad at (624, 2528), the Solar Collectors at (176, 2432) to (176, 2608) and the Spider all stand within about 310 of it. Leave them to your army.
Take the Beacon (50:00 onward)
- Gather the army at 5. Clear the Sentinels at (1200, 2384), (1200, 2576) and (1328, 2976) and the Defenders around the pond, Diplomats first and Goliaths behind.
- Kill the Spider that guards the beacon and the three Hawks that guard it from 3:20. The Spider's paralyzer stuns your units, but the Commander is immune to it.
- Walk the Commander to 6 and capture the Alien Beacon. A capture takes about a minute on an undamaged target.
- Then hunt every last Arm unit and Scorpion: the Moho Mines at (272, 1696), (304, 2080) and (448, 3008), the Guardian and the Radar Tower in the north-west, whatever the factories built, and the three Scorpions near (2163, 586) in the north.
What Changes on Hard
- You still have only the Commander, with 1000 metal and 1000 energy.
- Arm has 102 units instead of 84: 21 Defenders, 5 Flakkers, 7 Sentinels, 5 Moho Mines and 3 Eraser radar jammers.
- The Adv. Aircraft Plant orders 4 Brawlers and 4 Hawks at once, and 4 more of each every 1:40, up to 60 of each. You need Pulverizers within the first few minutes.
- A second Hovercraft Platform at (1744, 2368) orders 4 Anacondas, 4 Swatters, 4 Wombats, a Construction Hovercraft, 4 more Anacondas and 6 more Wombats from the start.
- The seventh Sentinel stands at (2192, 2448), and the three new Flakkers guard the north-west corner around (336, 690).
- The Scorpions, the Spider and every timed patrol are the same as on Medium.
- The computer player keeps all the income its buildings make, against 70 percent on Medium.
Which Units Beat Theirs
| Arm unit | Its threat | Your answer |
|---|---|---|
| Scorpion | Beam of 400 damage every 1.2 seconds at range 320, 1000 hit points | Gaat Gun (range 400) at home, Punisher (1200) or Diplomat (800) further out |
| Sentinel | Laser, 180 damage at range 430 | Diplomat (three rockets of 500 kill one) |
| Guardian | Plasma cannon, 360 damage at range 1250, 2477 hit points | Intimidator: two shells of 2400 |
| Wombat | Rocket, 300 damage at range 670 | Punisher or Diplomat |
| Brawler | Gunship, 920 hit points | Pulverizer (95 damage to it), Cobra flak |
| Phoenix | Bomber, 470 hit points | Pulverizers: five missiles each |
| Spider | Paralyzer that stuns, range 220 | The Commander, who cannot be stunned, or any gun with more range |
Metal and Energy
Metal is scarce. The surface value is 3 and the map has only 13 deposits. Three are at your start: (4216, 1160) and (4248, 1528), worth 223, and (4424, 1432), worth 127. Another lies south at (4168, 2600), and two more across the north-east river at (3592, 488) and (3096, 504). Arm's Moho Mines sit on four others, and the one at (2008, 1768) is yours once B falls.
The mission sets the wind very low, between 9 and 90, so rely on Solar Collectors, which make a steady 20. The map's only geothermal vent, at (1000, 2872), carries Arm's Geothermal Powerplant. Once that is gone, a Construction Vehicle can build a Geothermal Powerplant there for 250 energy. Eight Dragon's Teeth near (1130, 2450) give 8 metal each when reclaimed. The Intimidator costs 4328 metal and 62,520 energy, so put up the Fusion Power Plants, 1050 energy each, well before you start it.
Traps
- The Scorpion's weapon is called a Paralyzer, but it does not stun: every shot does 400 damage. It also out-ranges the Commander's D-gun.
- Hitting the Scorpion at the centre of the crater sends two Scorpions straight at your Commander.
- Hitting the Moho Mine at B releases the two Brawlers at C.
- The 10:00 Phoenix bombers look for Hovercraft Platforms first, then Aircraft Plants, then the Commander.
- The beacon has 11,000 hit points. If it is destroyed it blows up with up to 5500 damage within 256 pixels, and the mission can no longer be won. Keep artillery and the Intimidator off it.
- The Fusion Reactor at (352, 3312) dies in an atomic blast of up to 2000 damage within 258 pixels.
- The Spider stuns any of your units except the Commander. Kill it before you send your army near the beacon.