Alliance Walkthrough
You have one unit, a Heligrin, at the south edge of a Zhon jungle. Zhon has 141 units on the map, among them 44 hidden Trapdoor Spiders and 7 Death Totems. No help will come: the Heligrin cannot build, and the map has no sacred sites. You win as soon as the Heligrin comes within 160 of the spot where Thirsha waits in the north-west corner. You lose if it dies.
You do not need to fight. The short way north runs past two Death Totems, but a longer loop up the open east side and back west along the north stays out of reach of every totem and every spider. The mission sets the same forces at every difficulty and runs no script of its own.
The Battlefield
High jungle plateaus cover much of the map, and all 44 Trapdoor Spiders sit on top of them. Between the plateaus runs low ground with dirt roads and clearings. A band of plateau closes off the west half from about z 2000 to z 2400. In the middle there is one gap, and a Death Totem stands in it. North of the middle, the east side of the map beyond x 3800 is open ground all the way to the north edge. A lake lies in the north-east quarter. Thirsha stands on a raised square in the north-west corner, with her guards around her; its east and south sides slope down to the road.
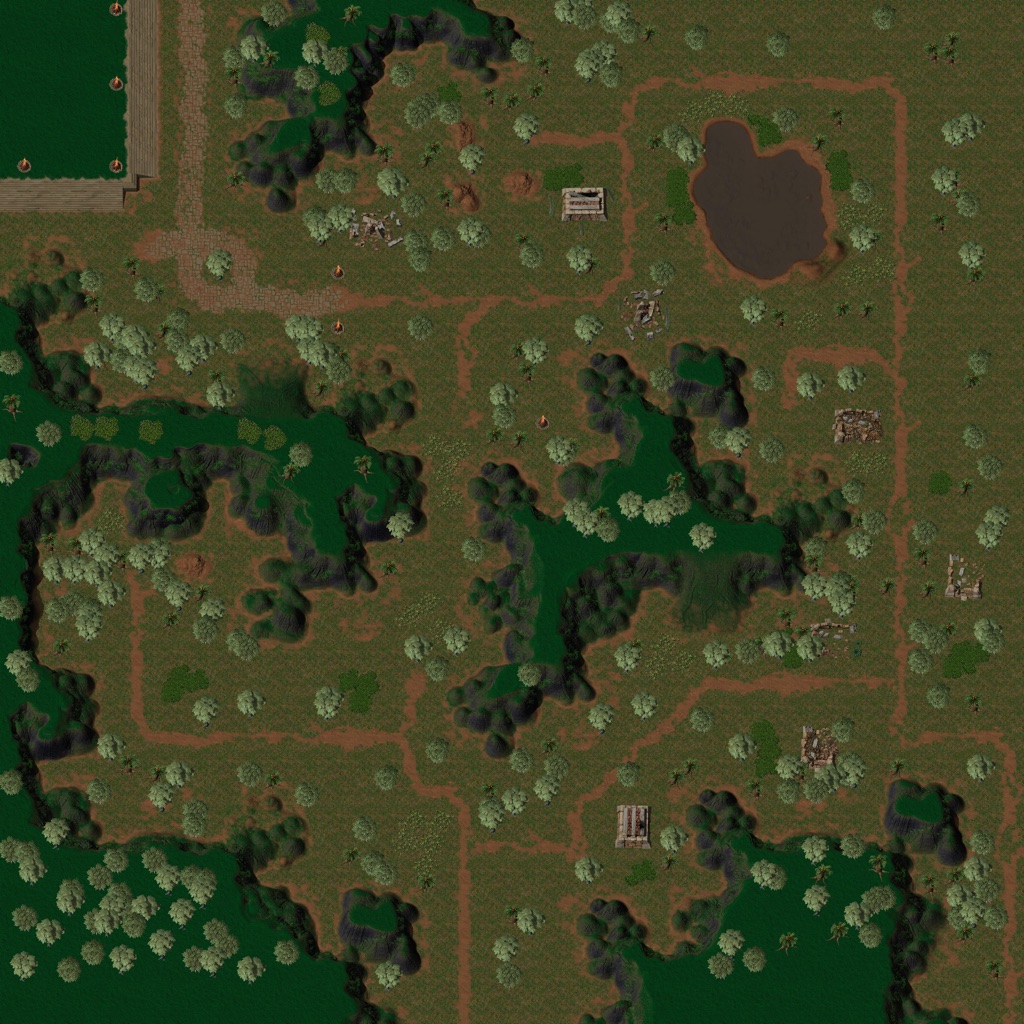
- 1Your start. The Heligrin is alone.
- 2The Risen Wolf patrol crosses your path here.
- 3Turn north here, more than 600 from the Wisps at H.
- 4Go round the north-east corner of the lake.
- 5North of the lake. The Basilisks here cannot harm the Heligrin.
- 6This point is more than 700 from the Death Totem at I. Do not cut the corner to the north.
- 7The plaza. Set the Heligrin to Passive here.
- 8Thirsha. Come within 160 of this spot to win.
- AThirsha's 20 guards: 7 Stone Giants, 4 Trolls and 9 Goblins.
- B7 Jungle Orcs. Each one waits until it is attacked.
- CA Death Totem in the only gap through the middle. A second one stands at (1760, 2624).
- D5 Risen Wolves. They patrol a loop through the middle and the east.
- EA Death Totem 752 from your start. Do not head west.
- F6 Swamp Beasts in the lake. They wait until 30:00.
- GA Death Totem on the plateau west of your route.
- H3 Wisps. They wait until 30:00.
- IThe northern Death Totem.
The Zhon Timetable
Most of Zhon's units stand still until they are attacked or until a timer runs out. These are the ones that move or wake up.
| Time | What happens |
|---|---|
| From the start | 5 Risen Wolves patrol a loop through (2320, 3648), (3936, 3840), (3792, 2032) and (2496, 1872). Two Gryphons patrol beside Thirsha's square: one along the road south of it, between (912, 1152) and (64, 1184), the other north from (912, 1152) to (976, 96). One Drake patrols the north edge between (2192, 384) and (1568, 320). The other Drake hunts down every Bird on the map, then patrols between (2112, 432) and (1760, 768). 3 Hunters chase the Deer. 7 Jungle Orcs and 5 Basilisks walk patrols of their own. |
| When attacked | The 7 Jungle Orcs at B, and Thirsha herself, wait until they are attacked. |
| When Thirsha is attacked | Her 20 guards at A come off their wait. Their orders watch "ZONHUNT", Thirsha's unit name. |
| 30:00 | Waits end for the 6 Swamp Beasts at F, the 3 Wisps at H, 5 Basilisks in the west, 11 Jungle Orcs spread across the map and 9 Bats. Two of the Bats fly to (656, 1760) and (1280, 912). The data gives the rest no further orders. |
| 60:00 | 4 Hunters near (2550, 2000) come off their wait. |
The Plan
Go East, Not North (0:00 to the Lake)
- Leave the start heading north-east, towards 2. The straight road north leads to the gap at C, where two Death Totems cover the way. Each throws 492 damage every 2.2 seconds to a range of 607. With 13,432 hit points, a totem outlasts anything the Heligrin can do from its own range of 400.
- The Risen Wolves from D cross your path near 2. They move at 2.4 against your 1.5, so you cannot outrun them. Let them close in, then cast Fire Wave. It does 2,600 damage to the units around the Heligrin, more than a wolf's 1,407 hit points. Keep 900 personal mana ready for it.
- At 3, turn north. A Basilisk patrols the east side, and its only weapon turns units to stone. The Heligrin cannot be turned to stone, so ignore it. Two Jungle Orcs walk up and down the east edge, about 450 to your right.
- Pass the lake on its east side and go round its north-east corner at 4. The Swamp Beasts in the lake reach 300 with their claws, and the route keeps more than 350 from them. They wait until 30:00, so do not stop here.
Along the North (5 to 7)
- From 5, head south-west to 6. More Basilisks patrol here; they are harmless to you. The straight line from 5 to 6 stays more than 650 from the Death Totem at I.
- From 6, go west to 7, along the foot of the plateau on your right. The Trapdoor Spider on that plateau, at (1376, 720), reaches 200, and the route passes 340 from it.
- The Gryphons patrol between 7 and 8. No other unit waits on them, so you can fight them. Each has 1,911 hit points, and three Guided Fire Balls (650 damage each) kill one.
Meet Thirsha (7 to 8)
- At 7, set the Heligrin to Passive. The 7 Jungle Orcs at B wait until they are attacked, and each hits for 999 in melee. A stray Fire Ball into the plaza would wake them.
- Walk past the orcs and up the east slope of the square to 8. The mission ends as soon as the Heligrin is within 160 of that spot. You never need to attack anything there.
Which Units Beat Theirs
| Zhon unit | Its threat | Your answer |
|---|---|---|
| Death Totem | Lightning, 492 damage every 2.2 seconds, range 607; 13,432 hit points | Stay more than 607 away. The route from 1 to 8 does. |
| Trapdoor Spider | Hidden; claws, 200 damage every 1.5 seconds, range 200; 15,808 hit points | Keep to the low ground. All 44 sit on the plateaus and cannot move. |
| Risen Wolf | Bite, 402 damage every 2 seconds; speed 2.4 | Fire Wave, 2,600 damage, when they gather round you. Each has 1,407 hit points. |
| Jungle Orc | 999 damage every 1.75 seconds in melee; 4,612 hit points | Leave the ones at B alone. Walk away from the patrols. |
| Stone Giant | Flying Stones, 1,269 damage, range 900; 10,310 hit points | Never attack Thirsha, and they stay where they are. |
| Gryphon | Flies; spear, 340 damage, range 510 | Guided Fire Ball: three shots kill one. |
| Basilisk | Turns a unit to stone, range 300 | Nothing. The Heligrin cannot be turned to stone. |
| Swamp Beast | Claws, 579 damage, range 300; 3,638 hit points | Pass the lake before 30:00, more than 300 from them. |
Mana
There is no mana to gather here: the map has no sacred sites, and the Heligrin cannot build. What matters is the Heligrin's own personal mana. It holds 1,000 and refills at 25 a second.
- Fire Ball costs nothing: 400 damage every 2.5 seconds, range 400.
- Guided Fire Ball costs 200 a shot: 650 damage every 1.5 seconds, range 360.
- Fire Wave costs 900: 2,600 damage to the units around the Heligrin, range 120.
Refilling 900 takes 36 seconds, so you get one Fire Wave per fight. Do not spend Guided Fire Balls on the way to 2; save the mana for the wolves.
Traps
- The Heligrin is the mission. If it dies, you lose, and nothing can replace it.
- Do not attack Thirsha. Her 20 guards' orders watch her unit, and the 7 Stone Giants among them throw 1,269 damage to 900.
- Do not attack the Jungle Orcs at B. Each one wakes when it is attacked.
- The Trapdoor Spiders are cloaked, so you will not see them on the plateaus. Trust the map: the route stays at least 200 from every one of them.
- Never walk into the gap at C. Two Death Totems cover it, and the plateaus on either side hold spiders.
- At 30:00, 34 units come off their waits all over the map. Be at Thirsha's square long before then.